
Integrations
SSO Microservice
Single Sign On Microservice
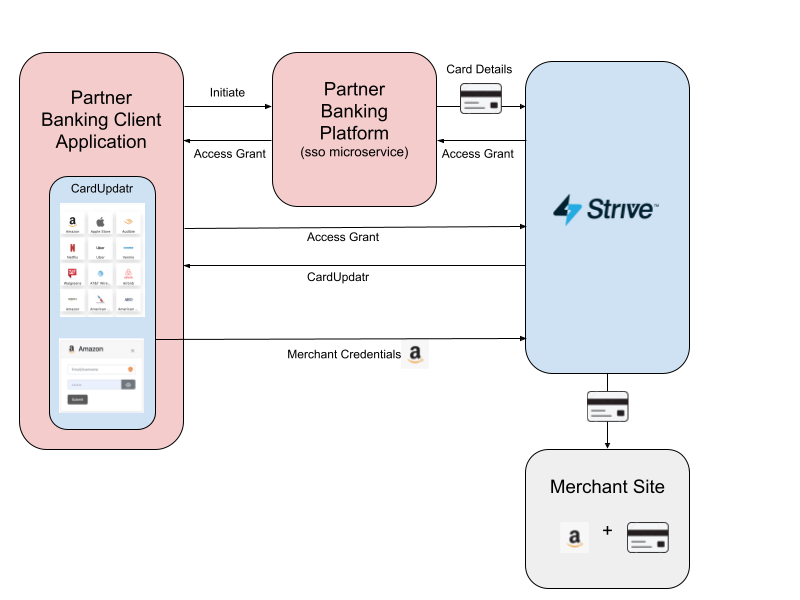
The Single Sign-On (SSO) microservice removes the friction of requiring the cardholder to manually enter their cardholder, card and address data. After making the necessary calls to the CardSavr API to set up the cardholder, simply hand over the token and card id received from the API when launching CardUpdatr. This will eliminate manual cardholder information entry from the cardholder journey experience.
Server Component
Calls to the CardSavr REST API are required to create the cardholder, card and address data. There are three SDKs that support this functionality: Java, Node and C#. The javascript library can also be used within a client to create the cardholder.
The data format for the data objects can be found on the API/SDK reference guide.
Node
The strivve-sdk github repository has instructions for setup and execution. There is a CardsavrHelper class that makes creating the token extremely simple:
const { CardsavrHelper } = require("@strivve/strivve-sdk/lib/cardsavr/CardsavrHelper");

try {
    const ch = CardsavrHelper.getInstance();
    const financial_institution = "default"; //all cardsavr instances come with a "default" fi
    //Setup the settings for the application
    ch.setAppSettings(cardsavr_server, app_name, app_key);
    //Create a session for the application user (cardholder agent)
    if (await ch.loginAndCreateSession(app_username, app_password)) {
        //Save the card on behalf of a temporary cardholder - return their username, grant, card par
        const data = await ch.createCard(app_username,
                                         financial_institution,
                                         cardholder_data,
                                         address_data,
                                         card_data);
        const handoff = { grant : data.grant,
                          username : data.cardholder.username,
                          card_id : data.card.id };
    }
} catch (err) {
    console.log(err);
}
Making calls to the CardSavr API requires a Cardsavr server and an integrator name and key. You will also need an app username and password that the application uses to log onto the cardsavr platform using the integrator key to encrypt its payloads.
This is accomplished within the loginAndCreateSession call. Once logged in, the application can call createCard which creates a user and card with an attached address. The response object contains three important pieces of data:
- The ephemeral username that was created for this cardholder (attached to the cardholder object that is part of the response)
- A one-time credential grant that can be issued to a different application (usually a frontend app) to assume the role of the cardholder -- this grant expires in three minutes
- The card_id for the created card, so the virtual browser knows which card to place
Many cardsavr functions are asynchronous and require await to extract the return data from the Promise.
Microsoft C Sharp
There is a corresponding C# SDK that accomplishes the same function:
using Switch.CardSavr.Http;
using Newtonsoft.Json;

CardsavrHelper helper = new CardsavrHelper();
helper.SetAppSettings(Context.accountBaseUrl, Context.accountCardholderAgentAppID, Context.accountCardholderAgentStaticKey);
await helper.LoginAndCreateSession(Context.accountCardholderAgentUserName, Context.accountCardholderAgentPassword, null, "{\"key\": \"my_trace\"}");

PropertyBag cd = new PropertyBag(){{"default", new PropertyBag(){{"token", "123"}}}};

ClientLogin login = await helper.CreateCard(Context.accountCardholderAgentUserName, "default",
    new Cardholder(){ custom_data = cd },
    new Card(){ first_name="Strivve",
                last_name="User",
                pan="4111111111111111",
                cvv="111",
                expiration_month="01",
                expiration_year="25" },
    new Address(){ is_primary=true,
                address1="1234 1st ave",
                city="Seattle",
                subnational="WA",
                postal_code="98006",
                country="USA",
                phone_number="5555555555",
                email="foo@foo.com" }
);
await helper.CloseSession(Context.accountCardholderAgentUserName);
log.Info("username: " + login.cardholder.username + ", grant: " + login.userCredentialGrant + ", card_id: " + login.card.id);
It's a very similar pattern and requires the same developer integrator and user credentials to set up. You'll also notice the usage of "custom_data", which is a generic object that can be passed into a user object. This custom_data attribute will appear in downstream reporting and as part of webhook notifications.
Java
There is a corresponding Java SDK that accomplishes the same function:
import javax.json.*;
import com.strivve.CardsavrRESTException.Error;
import com.strivve.*;

JsonObject response = null;
try {
    CardsavrSession.APIHeaders headers = this.session.createHeaders();
    headers.hydration = Json.createArrayBuilder().add("cardholder").build();
    JsonObject card = Json.createReader(new StringReader("{" +
        "\"cardholder\": {" +
            "\"cuid\": \"peLpzDnEHdhiiWEtuhUgIbN\"" +
        "}," +
        "\"customer_key":"peLpzDnEHdhiiWEtuhUgIbNpeLpzDnEHdhiiWEtuhUgIbN\"," +
        "\"pan\":\"4111111111111111\"," +
        "\"cvv\":\"123\"," +
        "\"expiration_month\":\"12\"," +
        "\"expiration_year\":\"24\"," +
        "\"name_on_card\":\"FirstName LastName\"," +
        "\"first_name\":\"FirstName\"," +
        "\"last_name\":\"LastName\"," +
        "\"email\":\"foo@foo.com\"," +
        "\"phone_number\":\"5555555555\"," +
        "\"address\":" +
            "{" +
                "\"cardholder_ref\": {" +
                "\"cuid\": \"{{CARDHOLDER_UNIQUE_KEY}}\"" +
            "}," +
            "\"first_name\":\"Switch\"," +
            "\"last_name\":\"Strivve\"," +
            "\"address1\":\"SGTClNSCCMqlfjuzTmJuepDyFgvWhlCMRycXlKGiRIooOJJkoXeObOcAwJMGeqjSDWfhTHobAWMimcCynMIQcvlBFSbMQlwUFyJ\"," +
            "\"address2\":\"AyFgoCTjCLXUQVylBAfkHJOtqkkKJjuaLHnmJpSctqBOQueIvciyAUPqYoFpkiAPlkGjgPuabhAPCHFPvaxciObOmIBvBUWpngD\"," +
            "\"city\":\"Seattle\"," +
            "\"subnational\":\"WA\"," +
            "\"postal_code\":\"98177\"," +
            "\"postal_other\":\"98177-0124\"," +
            "\"country\":\"USA\"," +
            "\"is_primary\": true" +
            "\"phone_number\": \"5555555555\"" +
            "\"email\":\"foo@foo.com\"" +
        "}" +
    "}")).read().asJsonObject();
    response = (JsonObject)session.post("/cardsavr_cards", card, headers);
} catch (CardsavrRESTException e) {
    System.out.println(e.getRESTErrors()[0]);
} catch (IOException e) {
    e.printStackTrace();
}

int cardId = response.getInt("id"); // card_id
String grant = response.getJsonObject("cardholder").getString("grant");
Drop-in Component Integration
StrivveCX (comming soon) or CardUpdatr documentation covers the specifics of integrating the acquired credentials into the UX components.